 |
| PACKING INSTRUCTIONS |
First, unzip your Helium bike case and fully unfold it. Make sure you have all the tools you will need to remove your seatpost, pedals, stem and rear derailleur.
|
|
STEP 1
A. REMOVE SEATPOST.
TIP: To make reassembly easier, mark the seat height on your seatpost before taking it off your bike. You will stow your seatpost in the main compartment when everything else has been packed. |
|
B. REMOVE PEDALS.
TIP: The pedal on the right side unscrews in the clockwise direction, while the left pedal unscrews counterclockwise. |
|
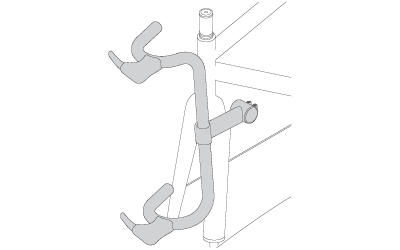
c. REMOVE REAR DERAILLEUR.
 |
|
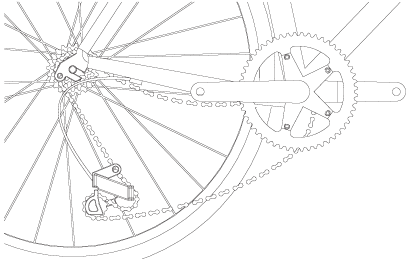
STEP 2
INSTALL CRANK AND CHAINSTAY COVER.
TIP: Remove the chain from the chainrings and point the right crankarm toward the rear dropouts. Make sure the chain remains outside of the cover. |
|
STEP 3
REMOVE WHEELS.
|
|
STEP 4
INSTALL FORK PROTECTOR.
TIP: To make this step easier, rest your bike’s BB on the foam block of the Helium’s base. |
|
STEP 5
ATTACH YOUR BIKE TO THE BASE.
A. BEGIN BY ATTACHING THE FORK TO THE FASTENING HUB.
 |
|
B. PLACE THE BOTTOM BRACKET ON THE FOAM BLOCK LOCATED AT THE CENTER OF THE BASE
AND SECURE IT BY FASTENING THE STRAP.
TIP: Thread the strap around the frame’s downtube and tighten it so that the BB rests solidly on the foam block. |
|
C. PUT THE PROTECTIVE REAR AXLE IN PLACE .
|
|
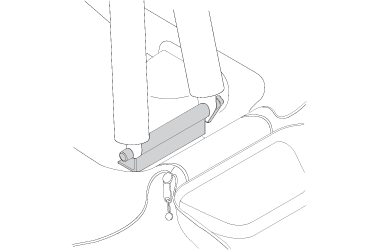
STEP 6
A. REMOVE THE HANDLEBAR AND STEM.
TIPS:
Fully unscrew and remove the headset cap.
Loosen the stem bolts and pull off the stem and bars.
Replace the headset spacers and reinstall the headset cap.. |
|
B. INSTALL THE STEM COVER AND STRAP THE HANDLEBAR DOWN.
TIPS: Using the velcro straps, fasten the handlebar to the fork, making sure the stem runs parallel to the frame. Be carefull to avoid kinking the cables.
|
|
STEP 7
STOW THE WHEELS.
TIPS:
Remove your quick releases and place them in one of the smaller pockets.
Arrange wheels on either sides of your frame’s rear triangle, beginning with the rear wheel and ensuring that the cassette is facing inward.
Align hubs with openings.
Install the plastic hub cover by sliding the metal pin inside the wheel’s axle.
Using the Velcro straps and ensuring the plastic hub covers are properly aligned, firmly anchor the wheels in place. |
|
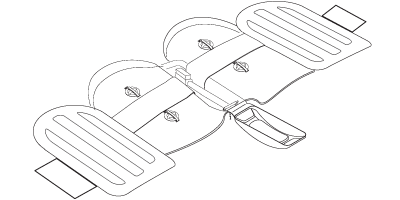
STEP 8
CLOSING YOUR BAG.
TIPS:
Place your seatpost on the base of the Helium case, under your frame’s downtube. At this time, you can also throw in your accessories like your shoes and helmet.
Fold the inflatable padding in and close all pockets.
Close the uppermost straps and pull up the main zip closure.
Pull up the front shell’s zip closure. |
|
STEP 9
INFLATE AIR BAGS.
TIPS:
Find the two inflation valves located inside the Helium case, underneath the front handle.
Inflate. About 70 pump strokes should do it. Do not over inflate. Press the valve cap in firmly.
Fasten both clips on the front handle.
Stow your pump, tools and smaller parts (quick releases, pedals, etc.) in the pockets on the upper portion of the case. Make sure zips are fully closed and tighten the two straps located on top of the case.
Good to go!
|
|